Mount Types

Common Welded Method
Install by welding the weld plate to existing steel
Din Rail Mounted
Attach to C-rail using C-rail nuts
Channel Strut Mounted
Attach to channel strut using channel adapter nut
Installation Instructions
Torque and Material Properties
| Clamp | Group | Bolt Size | Aluminum Cushion | Polypropylene Cushion | Polyamide Cushion |
| Lbf | Nm | Lbf | Nm | Lbf | Nm |
| Standard | S1 - S7 | 1/4" - 20 | 7 | 10 | 6 | 8 | 6 | 8 |
| Heavy Duty | H3, H4 | 3/8" - 16 | 22 | 30 | 9 | 12 | 15 | 20 |
| H5 | 3/8" - 16 | 26 | 35 | 11 | 15 | 18 | 25 |
| H6 | 1/2" - 13 | 41 | 55 | 29 | 30 | 30 | 40 |
| H7 | 5/8" - 11 | 89 | 120 | 33 | 45 | 41 | 55 |
| Twin | T1 | 1/4" - 20 | | 4 | 6 | 4 | 6 |
| T2 - T5 | 5/16" - 18 | | 9 | 12 | 9 | 12 |
The outlined particulars are approximate values and are only valid as references, which are not binding, also with regard to possible protection of third parties, and they do not exempt you from your own examination of suitability of the products delivered by us. Therefore, these values can only be used in a limited sense for construction purposes. The application of the products is carried out outside our control possibilities and, therefore, is exclusively subject to your own area of responsibility. If, however, liability should be possible, it would be limited for all damages to the value of the goods supplied by us and in use by you. We guarantee the quality of our products according to our general sales and delivery conditions. Recommended Pipe Clamp Spacing
Recommended Clamping for Bends
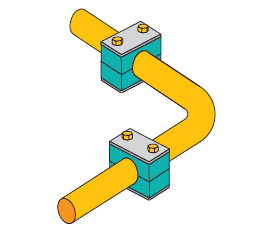
Bends in the line should be clamped on both sides of the bend as shown.
Installation Instructions
Installation on Weld Plates
Weld plates are available for the following series:
- Standard Series
- Heavy Series
- Twin Series
For best alignment, we recommend that you mark the clamp location before welding.
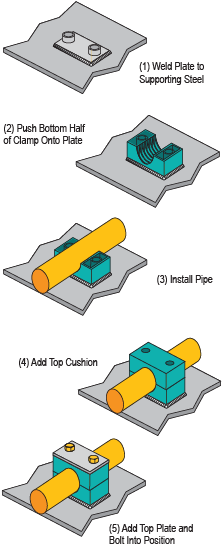
• Weld metal welding plates to a weight adjusted base.
• Clip lower half of clamp on to welding plate and insert tube; then add second clamp-half, cover plate, and tighten with screws provided.
• DO NOT weld with plastic clamp in position.
• After assembly the two clamp halves MUST NOT come into contact with each other.
Installations on mounting rails
Mounting rails can be used with the following series:
- Standard series
- Heavy series
- Twin series
Mounting rails are available in two different height sizes and are either welded or bolted to the supporting construction.
For Standard Series and Twin Series, insert hexagon rail nut and turn to lock. For Heavy Series, slide in rail nut.
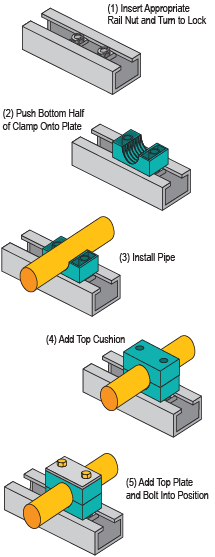
NOTE: The rail nut will slide within the rail so clamp units can be adjusted before being firmly bolted.
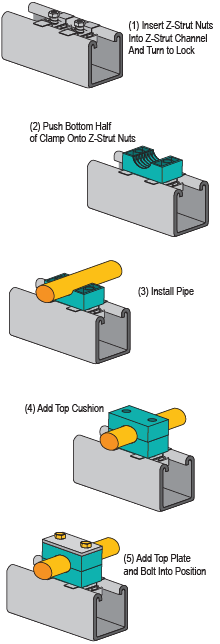
Channel Mount Installation
The Channel Strut Nuts can be used with any clamp using a 1⁄4-20 mounting bolt. This includes:
• Standard-Series
• Twin-Series (T1 Only)
Multi-Level Assembly
Our multi-level pipe clamps permit easy stacking of several tubes or pipes of the same group. The clamps are connected by stacking bolts.
Safety plates are inserted between the clamps to prevent the stacking bolts from turning.
The example below shows a stacking clamp added to a welded clamp; however, our stacking assemblies can be fitted to weld plates, rails, or strut in the same manner.
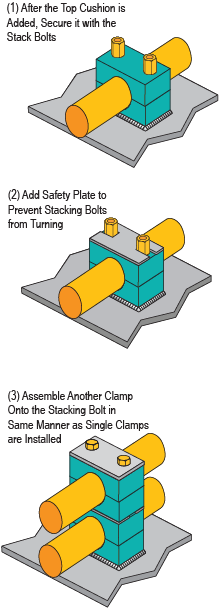
Stacking Assembly
• Weld on welding plate with a fixing bracket.
• Wedge on lower clamp-half, insert tube, add upper clamp-half and tighten with fixing screws.
• Apply a locking plate to upper half of the clamp to prevent fixing screw
from twisting.
• Mount the second tube clamp in exactly the same way.